Diese Webseite wurde mithilfe von Obisidian, Hugo, Hostinger und GitHub erstellt. Dazu sind folgende Schritte nötig:
- Erstelle Blog Beiträge in Obsidian
- Erstelle eine neue Webseite mithilfe von Hugo
- Synchronisiere Hugo mit Obisidian
- Erstelle ein GitHub Repository
- Erstelle ein Hosting mit Hostinger und füge das Git-Repository zu Hostinger hinzu
Einrichtung von Obisidian Link zu Überschrift
- Obisidan ist eine kostenlose Notizenapp, welche Markdown unterstützt
Wir gehen wie folgt vor:
- Lade dir Obisidan unter [[https://obsidian.md/]] herunter
- Erstelle einen neuen Ordner in Obisidan für die Blog-Beiträge
- Merke dir den Speicherort, indem du auf den Ordner einen Rechtsklick ausführst und auf ,,Show in system explorer" drückst
!
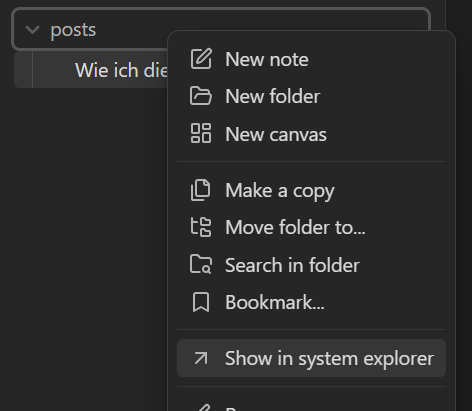
- Merke dir den Speicherort, indem du auf den Ordner einen Rechtsklick ausführst und auf ,,Show in system explorer" drückst
!
Das wäre es zunächst schon für Obisidan, im nächsten Schritt richten wir Hugo ein.
Hugo Link zu Überschrift
- Installiere Hugo unter [[https://gohugo.io/]] (und Git und Go, falls noch nicht auf dem System)
- Falls du Windows benutzt, installiere Hugo unter folgendem Link als binary: [[https://github.com/gohugoio/hugo/releases/tag/v0.146.6]] (installiere eine `…_windows-amd64.zip Datei und entzippe den Ordner; ausserdem muss die .exe Datei in die Systemumgebungsvariablen hinzugefügt werden)
- Teste, ob alles funktioniert hat (Nutze die PowerShell, falls du unter Windows arbeitest):
hugo version
- Erstelle eine neue Seite
hugo new site websitename
cd websitename
Installiere ein Hugo Theme Link zu Überschrift
- Hugo arbeitet mit vorgefertigten Themes
- finde ein Theme (ich verwende Coder), welches dir gefällt unter: [[https://themes.gohugo.io/]]
- Folge den Anleitungen des Themes und installiere das Theme als
git submodule
- Folge den Anleitungen des Themes und installiere das Theme als
- finde ein Theme (ich verwende Coder), welches dir gefällt unter: [[https://themes.gohugo.io/]]
# Initialisere git repository (in deinem Hugo Ordner)
git init

# Setze globale Variablen, username und mail, für git
git config --global user.name "Dein Name"
git config --global user.email "deine.email@beispiel.de"

# Installiere ein Theme (in meinem Fall hugo-coder)
# Nach dem Befehl sollte es im Hugo themes Ordner zu finden sein
git submodule add https://github.com/luizdepra/hugo-coder.git
Konfiguriere Hugo Link zu Überschrift
- Die meisten Themes haben eine Beispiel-Konfigurationsdatei, welche du übernehmen kannst
- Um das Theme auf deine Lieben anzupassen, musst du die
hugo.tomlDatei ändern- Öffne diese mit
code hugo.tomlodernotepad hugo.toml - Füge die Beispiel Konfiguration aus dem Theme ein
- Ändere was du willst
- Öffne diese mit
baseurl = "https://alperenaksoy.de/"
title = "Alperen Aksoy"
theme = "hugo-coder"
languagecode = "de"
defaultcontentlanguage = "de"


[pagination]
pagerSize = 6

#[services]
#[services.disqus]
#shortname = "axoi-diqus"

[markup.highlight]
style = "github-dark"

[params]
  author = "Alperen Aksoy"
  info = ["Software Engineer", "Mobile App Developer"]
  description = "Axoi Software Solutions Website"
  keywords = "blog,developer,personal,software,saas"
  avatarurl = "images/profile.png"
  #gravatar = "john.doe@example.com"

  faviconSVG = "/img/favicon.svg"
  favicon_32 = "/img/favicon-32x32.png"
  favicon_16 = "/img/favicon-16x16.png"

  # since = 2019
  # Git Commit in Footer, uncomment the line below to enable it
  # commit = "https://github.com/luizdepra/hugo-coder/tree/"

  enableTwemoji = true

  colorScheme = "auto"
  hidecolorschemetoggle = false

  # customCSS = ["css/custom.css"]
  # customSCSS = ["scss/custom.scss"]
  # customJS = ["js/custom.js"]

[taxonomies]
  category = "categories"
  series = "series"
  tag = "tags"
  author = "authors"

# Social links
[[params.social]]
  name = "Github"
  icon = "fa-brands fa-github fa-2x"
  weight = 1
  url = "https://github.com/aksoyalpi/"
[[params.social]]
  name = "Instagram"
  icon = "fa-brands fa-instagram fa-2x"
  weight = 2
  url = "https://instagram.com/alpislifee/"
[[params.social]]
  name = "LinkedIn"
  icon = "fa-brands fa-linkedin fa-2x"
  weight = 3
  url = "https://www.linkedin.com/in/alperen-aksoy-9364aa2a8/"

 [languages.en]
  contentDir = "content/en"
  languageCode = "en-US"
  languageName = "English"

# Menu links
[[languages.en.menu.main]]
  name = "About"
  weight = 2
  url = "about/"
[[languages.en.menu.main]]
  name = "Projects"
  weight = 3
  url = "projects/"
[[languages.en.menu.main]]
  name = "Contact"
  weight = 4
  url = "contact/"


[languages.de]
contentDir = "content/de"
languageCode = "de-DE"
languageName = "Deutsch"

[languages.de.params]
author = "Alperen Aksoy"
info = ["Softwareentwickler", "Mobile App-Entwicklung"]
description = "Webseite von Alperen Aksoy"
keyword = "software,blog,saas,persönlich"

[[languages.de.menu.main]]
  name = "Blog"
  weight = 1
  url  = "posts/"
[[languages.de.menu.main]]
  name = "Ãœber"
  weight = 2
  url = "about/"
[[languages.de.menu.main]]
  name = "Projekte"
  weight = 3
  url = "projects/"
[[languages.de.menu.main]]
  name = "Kontakt"
  weight = 4
  url = "contact/"
Teste Hugo lokal Link zu Überschrift
# Teste, ob Hugo mit deinen Änderungen läuft
hugo server -t hugo-coder # falls du ein anderes Theme gewählt hast, musst du hier den entsprechenden Namen eingeben
Synchronisiere Obsidian mit Hugo Link zu Überschrift
-
Wir gehen zunächst Schritt-für-Schritt durch (am Ende ist ein Skript, welche alle Aufgaben übernimmt)
-
Kopiere deine Blog-Beiträge von Obsidian in Hugo
robocopy pfad/zum/obsidian/posts/ordner pfad/zum/hugo/posts/ordner
- falls du noch keinen posts Ordner in Hugo hast, erstelle einen Ordner im Unterordner
contentmitmkdir posts
Füge Frontmatter in Obsidian hinzu Link zu Überschrift
- Der Frontmatter bestimmt die Metadaten, wie Titel, Datum etc, des Beitrags
Füge oben in einer Obisidan Seite folgenden Text hinzu:
---
title: blogtitle
date: 2024-11-06
draft: false
tags:
  - tag1
  - tag2
---
- tags kannst du dir vorstellen wie Hashtags (#blog, /#vollCool, …)
Lade Bilder von Obsidian in Hugo hoch Link zu Überschrift
- Leider werden die Bilder noch nicht richtig mitkopiert, da Obisidan diese an einem anderen Ort speicher
- Deswegen gibt es folgendes Skript, welches die Bilder von Obsidian kopiert und in Hugo hochlädt
import os
import re
import shutil
# Pfade (roh-Strings werden verwendet, um Windows-Backslashes korrekt zu behandeln)
beitraege_ordner = r"C:\Users\a.aksoy\Documents\website\content\posts"
anhaenge_ordner = r"C:\Users\a.aksoy\Documents\my_second_brain\Attachments"
statische_bilder_ordner = r"C:\Users\a.aksoy\Documents\website\static\images"
# Schritt 1: Verarbeite jede Markdown-Datei im Beiträge-Ordner
for dateiname in os.listdir(beitraege_ordner):
if dateiname.endswith(".md"):
dateipfad = os.path.join(beitraege_ordner, dateiname)
with open(dateipfad, "r", encoding="utf-8") as datei:
inhalt = datei.read()
# Schritt 2: Finde alle Bildverweise im Format 
bilder = re.findall(r'\[\[([^]]*\.png)\]\]', inhalt)
# Schritt 3: Ersetze Bildverweise und formatiere URLs korrekt
for bild in bilder:
# Erstelle den Markdown-kompatiblen Bildlink mit %20 für Leerzeichen
markdown_bild = f"})"
inhalt = inhalt.replace(f"[[{bild}]]", markdown_bild)
# Schritt 4: Kopiere das Bild in den Hugo static/images-Ordner (falls vorhanden)
quellpfad_bild = os.path.join(anhaenge_ordner, bild)
if os.path.exists(quellpfad_bild):
shutil.copy(quellpfad_bild, statische_bilder_ordner)
# Schritt 5: Schreibe den aktualisierten Inhalt zurück in die Markdown-Datei
with open(dateipfad, "w", encoding="utf-8") as datei:
datei.write(inhalt)
print("Markdown-Dateien erfolgreich verarbeitet und Bilder kopiert.")
GitHub Einstellen Link zu Überschrift
- Wir haben bereits ein Repository erstellt
Authentifizierung Link zu Überschrift
- Falls du noch kein SSH-Schlüssel hast, erstelle einen
ssh-keygen -t rsa -b 4096 -C "deine.email@beispiel.com"
Push in GitHub Link zu Überschrift
- Push den public Ordner in GitHub
# Step 8: Verschiebe den public-Ordner in den Branch hostinger mit subtree split und erzwinge das Pushen
echo "Deploying to GitHub Hostinger..."
git subtree split --prefix public -b hostinger-deploy
git push origin hostinger-deploy:hostinger --force
git branch -D hostinger-deploy
Hostinger einrichten Link zu Überschrift
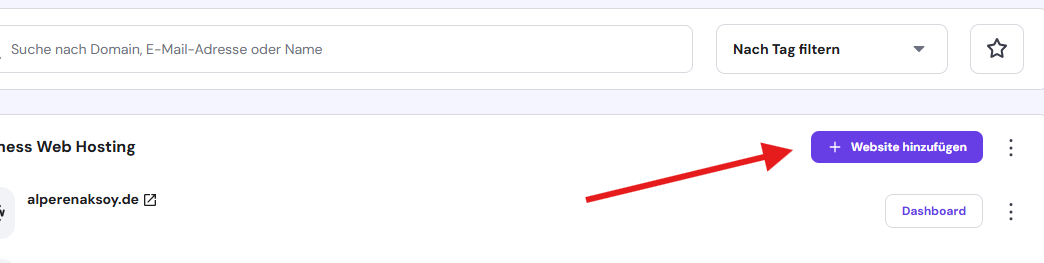
- Erstelle zunächst einen Hostinger account unter [[https://www.hostinger.com/de]]
- Erstelle eine neue Webseite (als HTML!) und kaufe eine Domain (oder wähle zunächst eine temporäre Domain aus)
!
Mit GitHub synchronisieren Link zu Überschrift
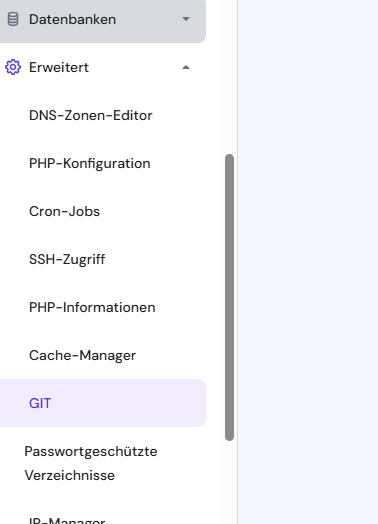
- Gehe anschließend auf den Dashboard der Webseite
- Klicke auf “Erweitert” > “GIT”
!
- Kopiere dir den SSH-Key aus Hostinger
- Füge den SSH-Key aus Hostinger in GitHub unter Profil > Einstellungen > SSH and GPG keys hinzu (Titel kannst du frei wählen)
!
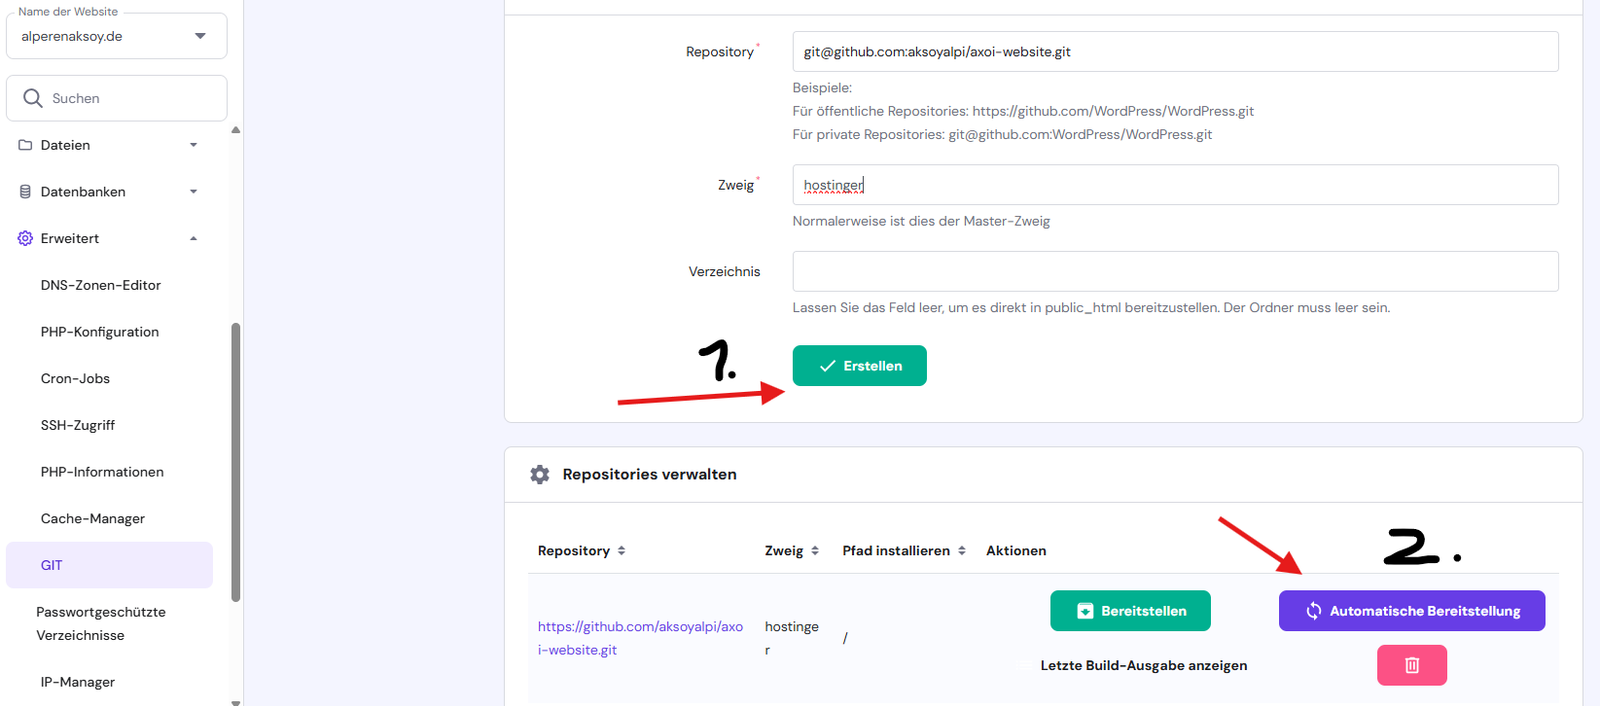
- Gehe zurück zu Hostinger und erstelle ein neues Repository
- drücke anschließend auf “Automatische Bereitstellung”, damit die nicht mehr manuell auf “Bereitstellen” drücken musst, falls du Änderungen auf der Webseite vornimmst
!
Mega Skript Link zu Überschrift
- um nur noch ein Skript auszuführen, wenn du Änderungen an der Webseite vornimmst, gibt es ein Skript, welche alle vorherigen Schritte einbezieht
- gehe in den Hugo Ordner und erstelle eine Skriptdatei
# Erstelle PowerShell Skript
code updateblog.ps1

code updateblog.sh # für linux/mac (Bash)
- Dadurch muss du lediglich
./updateblog.ps1oder./updateblog.shaufrufen, wenn du Änderungen an der Webseite vornimmst- Synchronisierung von Obisidian zu Hugo zu GitHub zu Hostinger erfolgt automatisch
HERZLICHEN GLÜCKWUNSCH 😁
Windows Link zu Überschrift
# PowerShell Script for Windows

# Set variables for Obsidian to Hugo copy
$sourcePath = "C:\Users\path\to\obsidian\posts"
$destinationPath = "C:\Users\path\to\hugo\posts"

# Set Github repo
$myrepo = "reponame"

# Set error handling
$ErrorActionPreference = "Stop"
Set-StrictMode -Version Latest

# Change to the script's directory
$ScriptDir = Split-Path -Parent $MyInvocation.MyCommand.Definition
Set-Location $ScriptDir

# Check for required commands
$requiredCommands = @('git', 'hugo')

# Check for Python command (python or python3)
if (Get-Command 'python' -ErrorAction SilentlyContinue) {
    $pythonCommand = 'python'
} elseif (Get-Command 'python3' -ErrorAction SilentlyContinue) {
    $pythonCommand = 'python3'
} else {
    Write-Error "Python is not installed or not in PATH."
    exit 1
}

foreach ($cmd in $requiredCommands) {
    if (-not (Get-Command $cmd -ErrorAction SilentlyContinue)) {
        Write-Error "$cmd is not installed or not in PATH."
        exit 1
    }
}

# Step 1: Check if Git is initialized, and initialize if necessary
if (-not (Test-Path ".git")) {
    Write-Host "Initializing Git repository..."
    git init
    git remote add origin $myrepo
} else {
    Write-Host "Git repository already initialized."
    $remotes = git remote
    if (-not ($remotes -contains 'origin')) {
        Write-Host "Adding remote origin..."
        git remote add origin $myrepo
    }
}

# Step 2: Sync posts from Obsidian to Hugo content folder using Robocopy
Write-Host "Syncing posts from Obsidian..."

if (-not (Test-Path $sourcePath)) {
    Write-Error "Source path does not exist: $sourcePath"
    exit 1
}

if (-not (Test-Path $destinationPath)) {
    Write-Error "Destination path does not exist: $destinationPath"
    exit 1
}

# Use Robocopy to mirror the directories
$robocopyOptions = @('/MIR', '/Z', '/W:5', '/R:3')
$robocopyResult = robocopy $sourcePath $destinationPath @robocopyOptions

if ($LASTEXITCODE -ge 8) {
    Write-Error "Robocopy failed with exit code $LASTEXITCODE"
    exit 1
}

# Step 3: Process Markdown files with Python script to handle image links
Write-Host "Processing image links in Markdown files..."
if (-not (Test-Path "images.py")) {
    Write-Error "Python script images.py not found."
    exit 1
}

# Execute the Python script
try {
    & $pythonCommand images.py
} catch {
    Write-Error "Failed to process image links."
    exit 1
}

# Step 4: Build the Hugo site
Write-Host "Building the Hugo site..."
try {
    hugo
} catch {
    Write-Error "Hugo build failed."
    exit 1
}

# Step 5: Add changes to Git
Write-Host "Staging changes for Git..."
$hasChanges = (git status --porcelain) -ne ""
if (-not $hasChanges) {
    Write-Host "No changes to stage."
} else {
    git add .
}

# Step 6: Commit changes with a dynamic message
$commitMessage = "New Blog Post on $(Get-Date -Format 'yyyy-MM-dd HH:mm:ss')"
$hasStagedChanges = (git diff --cached --name-only) -ne ""
if (-not $hasStagedChanges) {
    Write-Host "No changes to commit."
} else {
    Write-Host "Committing changes..."
    git commit -m "$commitMessage"
}

# Step 7: Push all changes to the main branch
Write-Host "Deploying to GitHub Master..."
try {
    git push origin master
} catch {
    Write-Error "Failed to push to Master branch."
    exit 1
}

# Step 8: Push the public folder to the hostinger branch using subtree split and force push
Write-Host "Deploying to GitHub Hostinger..."

# Check if the temporary branch exists and delete it
$branchExists = git branch --list "hostinger-deploy"
if ($branchExists) {
    git branch -D hostinger-deploy
}

# Perform subtree split
try {
    git subtree split --prefix public -b hostinger-deploy
} catch {
    Write-Error "Subtree split failed."
    exit 1
}

# Push to hostinger branch with force
try {
    git push origin hostinger-deploy:hostinger --force
} catch {
    Write-Error "Failed to push to hostinger branch."
    git branch -D hostinger-deploy
    exit 1
}

# Delete the temporary branch
git branch -D hostinger-deploy

Write-Host "All done! Site synced, processed, committed, built, and deployed."
Linux/Max (Bash) Link zu Überschrift
#!/bin/bash
set -euo pipefail

# Change to the script's directory
SCRIPT_DIR="$(cd "$(dirname "${BASH_SOURCE[0]}")" && pwd)"
cd "$SCRIPT_DIR"

# Set variables for Obsidian to Hugo copy
sourcePath="/Users/path/to/obsidian/posts"
destinationPath="/Users/path/to/hugo/posts"

# Set GitHub Repo
myrepo="reponame"

# Check for required commands
for cmd in git rsync python3 hugo; do
    if ! command -v $cmd &> /dev/null; then
        echo "$cmd is not installed or not in PATH."
        exit 1
    fi
done

# Step 1: Check if Git is initialized, and initialize if necessary
if [ ! -d ".git" ]; then
    echo "Initializing Git repository..."
    git init
    git remote add origin $myrepo
else
    echo "Git repository already initialized."
    if ! git remote | grep -q 'origin'; then
        echo "Adding remote origin..."
        git remote add origin $myrepo
    fi
fi

# Step 2: Sync posts from Obsidian to Hugo content folder using rsync
echo "Syncing posts from Obsidian..."

if [ ! -d "$sourcePath" ]; then
    echo "Source path does not exist: $sourcePath"
    exit 1
fi

if [ ! -d "$destinationPath" ]; then
    echo "Destination path does not exist: $destinationPath"
    exit 1
fi

rsync -av --delete "$sourcePath" "$destinationPath"

# Step 3: Process Markdown files with Python script to handle image links
echo "Processing image links in Markdown files..."
if [ ! -f "images.py" ]; then
    echo "Python script images.py not found."
    exit 1
fi

if ! python3 images.py; then
    echo "Failed to process image links."
    exit 1
fi

# Step 4: Build the Hugo site
echo "Building the Hugo site..."
if ! hugo; then
    echo "Hugo build failed."
    exit 1
fi

# Step 5: Add changes to Git
echo "Staging changes for Git..."
if git diff --quiet && git diff --cached --quiet; then
    echo "No changes to stage."
else
    git add .
fi

# Step 6: Commit changes with a dynamic message
commit_message="New Blog Post on $(date +'%Y-%m-%d %H:%M:%S')"
if git diff --cached --quiet; then
    echo "No changes to commit."
else
    echo "Committing changes..."
    git commit -m "$commit_message"
fi

# Step 7: Push all changes to the main branch
echo "Deploying to GitHub Main..."
if ! git push origin main; then
    echo "Failed to push to main branch."
    exit 1
fi

# Step 8: Push the public folder to the hostinger branch using subtree split and force push
echo "Deploying to GitHub Hostinger..."
if git branch --list | grep -q 'hostinger-deploy'; then
    git branch -D hostinger-deploy
fi

if ! git subtree split --prefix public -b hostinger-deploy; then
    echo "Subtree split failed."
    exit 1
fi

if ! git push origin hostinger-deploy:hostinger --force; then
    echo "Failed to push to hostinger branch."
    git branch -D hostinger-deploy
    exit 1
fi

git branch -D hostinger-deploy

echo "All done! Site synced, processed, committed, built, and deployed."
Die Idee zu diesem Projekt habe ich von folgendem Video